Posts

Showing posts with the label DIY

The Front Door...

Image
I am debating painting my front door.  This debate has been going on in my head for a while and I think I've finally decided that I should do it.  The big question now is: what color ? I would love something like this..  But in keeping with the local architecture it will never happen. The doors we have now are similar to this but painted a cream color (Sherwin Williams Muslin).  Source I kind of like this green door (Sherwin Williams Edamame) .  Our house is a bit lighter and not quite this southwest looking but I think this color would work. Source Of course, there's always black - which was my first idea.   I'll be out getting swatches tomorrow and hopefully I can make a decision before it gets too hot to paint. I'd love to hear your front door paint color ideas, too.

Pottery Barn Knock Off - Easter Flag

Image
I saw a cute burlap Easter bunny flag in the Pottery Barn a while back for $39 (it is no longer available).  I didn't think the price was too bad but I knew I could make something similar and just as cute. Pottery Barn  I actually ended up making two of these - one using burlap and one using drop cloth.  And I added a cute pom pom tail to both.  I made the hanging rod with a dowel and two finials painted black to resemble wrought iron. For the drop cloth bunny I painted the bunny (I just Googled 'bunny silhouette' and picked out a bunny, printed it and traced around the bunny on the drop cloth with chalk.) I sewed the edges, making a pocket for the rod.  I added a bow to the neck, a button for the eye and the pom pom for the tail. Here's the burlap bunny. I traced the bunny freehand on white flannel and sewed it on the burlap. I used the same type of dowel/finial for the rod. I added a pom pom for his tail, too. I ha...

Easy DIY desktop accessory...

Image
We have graduated from Pottery Barn Kids to Pottery Barn Teen around here.  LM loves perusing the catalogs and when it was time to get new bedding she chose it from PB Teen.  The newest PB Teen catalog is full of fun inspiration like the little jars below.  I didn't see that they were for sale in the catalog but I knew I could make my own version of them for little or no money. Pottery Barn Teen I used a jar I had on hand along with chalkboard and craft paint.  I painted the inside of the jar with white craft paint and the lid with Martha Stewart's 'pool' craft paint. I painted a square in the front with the chalkboard paint.  After letting the paint dry I was ready to use this little container on LM's desk. I only made one of these but I think it turned out so cute that I'll make a few more.  I had all of the supplies on hand so I spent no money on this.  I'm linking up to Frugal Friday at the Shabby Nest & Weekend Blogg...

12 Most Popular Posts of 2012

Image
As the year comes to an end, I always like to look back to see what I worked on over the year and what themes or ideas were popular here at September Acres.  I love reading year in review type posts and there are a ton of them out there right now.  I hope you will enjoy reading (or re-reading) my most popular posts from this past year. 31 Days of Organization-Day 1 - This is where the series starts.  It has links to all of the posts for the month (a few of them are also on the top 12 list). Home Management Notebook - Also part of the 31 Days series.  The notebook has been such a useful tool for me. DVD/CD Storage - Even with MP3 players and the like DVD & CD storage can be a bear.  This solution really helped keep our home looking a bit neater.  This was also part of the 31 Days Series. Organizing Basics - Yet another in the organizing series.   Key Lime Bar Recipe - We spent a week organizing our kitchens and I loved taking a break t...

Oh Christmas Tree...

Image
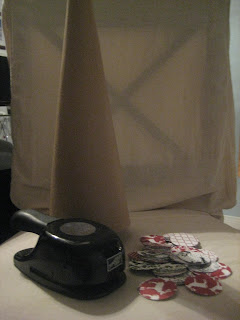
I found a super cute idea for a Christmas tree decoration in a book a while back and decided to recreate it this year.  Not only was it cute, it seemed really simple and used only a few supplies: Paper Cone type Christmas tree, any size. Scrapbook paper (I used a pack of paper with coordinating prints) Adhesive Circle punch (mine was 1 3/8") Ribbon - I used a fairly wide one but I think you could use whatever you like Punch out circles of scrapbook paper.  I started by punching out 125 circles and ended up punching about 25 more to finish the tree. Starting at the bottom of the tree, glue the circles to the tree with your adhesive of choice.  I used glue dots but I've had to re-glue a few of the circles after they fell off.  When I re-glued, I just used good old Elmer's glue & and haven't had any of those fall off so maybe that's how I should have started. :) Work your way up the tree, overlapping a bit with each row. Add a ribbo...

From Halloween to Harvest...

Image
I found this black feather wreath at Michaels and snatched it up.  I added an orange glitter spider for Halloween (I had already taken it off when I took this photo.) but really wanted to figure out a way to keep it up until Christmas.  Knowing the orange spider wouldn't work, I started brainstorming. I came up with some fall colored leaves (cut with my Cricut) and paper acorns (using an ornament punch). I finished it up with a tan ribbon. I think it turned out pretty cute and will work Until I bring out Christmas.  Most importantly, I didn't spend any money on this transformation.  Always a good thing for me! Linking up to Frugal Friday at the Shabby Nest.

Three Little Pumpkins - DIY

Image
If you're anything like me you are always looking for ways to add seasonal touches to your home without spending much (or any) money.   Like many of you, I have oodles of scrapbook paper.  To be honest it's probably more than I could ever use.  So when I wanted to add a little more fall to the house without a trip to the store I headed straight to the scrapbook paper. I started with three little pumpkins I cut with my Cricut, a piece of 12 X 12 scrapbook paper and a frame I had (part of my 90% off haul from Michaels a few weeks ago). If you have a Cricut, the 'Stretch your Imagination' cartridge is fantastic for seasonal die cuts - it's filled with really cute images for every holiday and season. I glued the three little pumpkins to the scrapbook paper (cut to 5X7) and put it in the frame (which ended up costing me 69 cents!)  I love the way it turned out and am deciding where to put it - it will possibly go on the mantel  or in the kitchen...

Re-Upholstered...

Image
I tackled my first re-upholstery project a couple of weeks ago.  It was really more like re-covering since it was super simple and no-sew.  I have to apologize for the poor quality of these photos.  They were taken on my phone.  I really need to get my camera out from now on. I have had this little bench for almost twenty years and the entire time it's been covered in this fabric.  I've never been in love with it but only recently did I decide I wanted to do something about it. I went to Hobby Lobby to look for some fabric.  I had something bright and geometric in mind.  But I don't always  hardly ever end up with what I have in mind.                                            This black, grey and brown circle print is what I ended up with.  My husband actually pointed it out saying he liked it so I decided to give...