Posts

Showing posts with the label Arts and Crafts

It's Novermber 30th, Is your Advent Calendar Ready?

Image
December 1st can sneak up on us, can't it?  A late Thanksgiving can really throw me for a loop.  As in, December 1st is on Tuesday.  The Tuesday that is the day after tomorrow.  We have always had an advent calendar around here (or maybe even two) and most years I'm on top of things but this year, not so much.  So not on top of things that I bought our advent calendar last night. First time I've bought one. Ever.  With a 13, almost 14 year old I didn't feel so bad since she actually asked for this one and was thrilled I said yes. So, I've already put the guilt behind me.  But in the good old days gone by I would never have purchased an advent calendar.  I'm imagining it's November 30th and I don't have my calendar yet.  I've got the Elf on its Shelf but no Advent to be found.  What's a girl to do? Christmas Book Countdown I'll assume that you have all of your Christmas books handy.  I loved this countdown when LM was younge...

Day 19- Making your House your Home - Craft Day...

Image
A rainy or snowy day is the perfect time for a family craft day. It's a great alternative to other indoor activities like tv or video games.  Plan ahead for those inevitable days with the following resources: Spoonful - this website has tons of great craft ideas as well as recipes, holiday and party ideas.  You'll never run out of inspiration here. Family Fun Magazine - This has long been a go-to craft resource for me.  I especially love this owl project.  Better Homes and Gardens - Another great craft resource - for kids and adults. Martha Stewart - Of course you can find really great ideas for a craft day project on her website. Oriental Trading - If you want to buy craft kids for a group (say for a birthday party) this is a great resource.  Their prices are unbeatable. This is part of my 31 Days series. All posts can be found here .

Easy DIY desktop accessory...

Image
We have graduated from Pottery Barn Kids to Pottery Barn Teen around here.  LM loves perusing the catalogs and when it was time to get new bedding she chose it from PB Teen.  The newest PB Teen catalog is full of fun inspiration like the little jars below.  I didn't see that they were for sale in the catalog but I knew I could make my own version of them for little or no money. Pottery Barn Teen I used a jar I had on hand along with chalkboard and craft paint.  I painted the inside of the jar with white craft paint and the lid with Martha Stewart's 'pool' craft paint. I painted a square in the front with the chalkboard paint.  After letting the paint dry I was ready to use this little container on LM's desk. I only made one of these but I think it turned out so cute that I'll make a few more.  I had all of the supplies on hand so I spent no money on this.  I'm linking up to Frugal Friday at the Shabby Nest & Weekend Blogg...

Semi-homemade Valentines...

Image
Valentine's Day is less than a week away so we are heading into the official 'last minute' phase.  It's high time to get any cards you need to mail to the post office.  Everyone loves a homemade card, right? If you've thought of making them but then realized that you're running out of time, this is the project for you. These are 'semi-homemade' valentines.  I picked up this set of chevron note cards at the Target $ spot (for $1, natch).  I thought they would make the perfect cards for valentines but they just needed a little something. I got out some ribbon, paper and stickers and went to work, creating four unique but similar cards to send to friends and family.  I made my cards fairly simple but the sky's the limit here.  It's the perfect way to use up extra paper and ribbon as well as leftover stickers. Happy creating! Linking up to Tuesday's Treasures at My Uncommon Slice of Suburbia.

Valentine Tree

Image
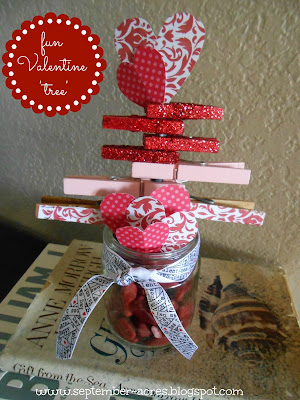
Last night LM worked on Valentine's for her classmates while I worked on this little Valentine 'tree'.  I mentioned the project here , knowing my tree would be completely different from the original .  And it definitely is.  When I spotted the inspiration piece I thought the tree was made out of clothes pins (yeah, I don't know what I was thinking, but it was before I got my new glasses) and I had it stuck in my head that I would make a tree with clothes pins.  So that's what I did! I had the red glitter & pink clothes pins on hand.  The red and white ones are regular old clothes pins to which I mod podged scrapbook paper.  The hearts are made from some scrapbook paper scraps.  I attached the clothes pins to a lolly pop stick (the kind you buy to make your own pops).  I bought nothing new for this project - you have to love that - well at least I do! I think the thing I love the most about this project is that after the holiday...

XO

Image
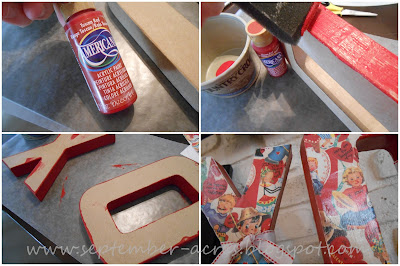
Over the weekend I worked on my version of the 'XO' letters I saw at Tatortots and Jello .  I fell in love with the vintage looking Valentine paper at Hobby Lobby and knew that's what I would use for these letters - even though it was nothing like what I had in my head.  I painted the sides with red craft paint (Tuscan red, that is) instead of using a different paper as I originally had planned.  I mod podged the paper after painting the sides and added some ribbon & a glitter mini-clothespin (which I got at our now closed Michaels). This is a super easy project and one that the kids can be involved in as well.  It took me about 30 minutes to complete plus drying time (which wasn't more than another 20-30 minutes here in dry Arizona).  And the possibilities for colors, letters and accessories are endless.  It goes way beyond Valentine's Day. Initials for new babies or birthdays. 'Hop' or 'Egg' for Easter. 'Love' for a weddi...

I heart February....

Image
I guess I'm at the age where every month I say "I can't believe it's already (fill in the month here).  Where does the time go?"  So, once again I ask "where did January go?" January seems to be full of pressure.  Pressure to keep those resolutions (one reason why I didn't make any this year) , pressure to get everything cleaned up after the holidays, pressure to get back in the swing of things after time off, pressure to tie up any loose ends from the prior year.  I also feel like January should be this relaxing, laid back month to snuggle up in front of a fire and read.  That never happened last month - it was go, go, go here at September Acres. Hello, February!  I love this month because is signals that January is behind us.  I find it a more relaxing month.  There are fun things to look forward to with Valentine's day - especially when you have kids.  Getting the little Valentines together for classmates and filling the house with ...

Fun with Advent Calendars...

Image
There are so many cute advent calendars out there this year and if you're not careful you could end up spending a small fortune on one of them.  Before you do that, consider a fun DIY advent calendar.  There are many ideas and tutorials out there that are budget friendly and really fun to put together.  In no particular order here are 12 of my favorites - I'd  have them all in my home if I could! The Envelope Advent Calendar - I just love the idea of this because it's super easy and pretty inexpensive.  Most of us have envelopes on hand to make this happen.  This is the perfect type of calendar for 'experience' treats as opposed to toys or candy.  Things like: watch 'Elf' tonight, go sledding or make cookies with mom can be printed out on the computer on paper and tucked in the envelope for a fun activity.  This one from A Few Things From My Life is one of my favorites. A Few Things From My Life Muffin Tin Advent Calendar  ...

31 Days of Home Organization - Interrupted

Image
 It's Day 16 of my 31 day challenge.  I decided to take a break and join Melissa today for her Under $10 Under 1 hour party.   A little break is always good although you could say this is a post on how to organize straws if you'd like. The idea of the party is to share something you created for under $10 that took you less than 1 hour.  My cute little paper straw holder (jar) took about 10 minutes and only cost $2. To make this I used: Jar - recycled jam jar - Free Paper - from my scrap paper supply -Already had Ribbon  - from my supply - Already had Spider -  I stamped this last year while at a friend's, thinking one day I might want to use it somewhere - Free Straws - $1.99 at Michaels. Grand total = $1.99 I love how it turned out.  It makes the perfect little Halloween decoration and it's useful to boot.  Although my husband said 'what good is a paper straw?  You can't actually drink out of it, can you?...

Painting Rocks...

Image
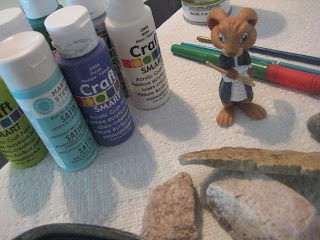
One of the things we wanted to do this summer was to paint rocks.  Just for fun really.  And living in the desert we have lots of rocks right outside our door.  So today was the day.  LM headed out after lunch to pick out a few rocks and I gathered up the paint and brushes. Paint supplies & rocks.  And the rabbit from "Hop".  Wonder how he got there? I painted one rock for us to keep.  I used rubber stamps and ink to make a little design.  I kind of like it! LM painted a rock for her Grandma who just had open heart surgery in June.  Luckily she picked a small one so it won't cost an arm and leg to mail it. I packaged it up in a cellophane bag with some shredded paper.   I think Grandma will love it! This activity is really fun, creative and very frugal.  Here's what we used: Rocks from the yard Craft paint Paint brushes Rubber stamps  Stamp pad I keep old yogurt containers and the like to p...

A Fun Gift Idea...

Image
Valentine's Day is coming up soon.  Really soon.  If you're looking for a fun, easy, quick, inexpensive gift idea, look at this one. All you need is a picture - one of you and your loved one or one of your favorite vacation spot would be fun for Valentine's Day, a foam brush , Mod Podge & canvas (flat or wrapped - I have used both).  Optional supplies included ribbon or decorative tape & glitter spray. Spread Mod Podge on your canvas with a foam brush then place the picture on top.  Then brush the picture with 2-3 coats of the Mod Podge (let dry between coats).  Once that is totally dry lightly spray the picture with the glitter spray (I used Krylon in silver).  If you are using the wrapped canvas you can finish off the edges with the ribbon or tape (see below). That's it!  A fun give that's ready to give.  I have given these and people LOVE them.  This is also fun for older kids to do (would be a fun teacher's gift for t...

A little bit of Glitter...

Image
 I wanted to frame my pink and green advent calendar  using something fun.  I thought the Krylon Glitter Blast in Citrus Dream would be just the ticket.  I got a simple white frame from Michaels.  It was 50% off - I think I ended up paying $5 or $6 for it but this is the kind of project that is perfect for a dollar store or goodwill frame, so you could spend less. Due to my super fabulous photography skills (is it me or the camera?) I am not sure you can really see how spectacular this turned out.  I hope I did it a bit of justice anyway.  I would use the Glitter blast again - it is so sparkly!  And the color is really fun! I think this will end up in LM's room with her new lime green mini Christmas tree.  Photos to come really soon. I'm linking up to Tuesday's Treasures @ My Uncommon Slice of Suburbia.

Advent Calendars...

Image
  I am a lover of advent calendars.  So when I saw this Stampin' Up stamp set I know I had to have it.  Not that I need to make or buy another advent calendar.  This set has a stamp for each day of December so instead of making a traditional advent calendar I decided to make more of a Christmas wall hanging using each day.  The one above is the first one I made.  I love the pink and green and the plan is that those will be my 'colors' for this year.  I still need a frame for that one - my idea is to get a frame (a cheap one) and spray paint it with my Krylon Glitter Blast in Citrus Dream (a bright green).  I'll definitely be sharing that and I hope it turns our pretty! The hanging below is framed and ready for gift giving.  I Love the simplicity of this.  Basic Christmas colors and lots of white.  I got a bit more creative with this one - some embellishments, embossing, etc. For a more rustic or down to earth lo...